

UDPATE AUGUST 2016: I’ve redesigned this automatic coop door so that one timer controls opening & one timer controls closing. See this blog post. Note that the parts list changes a bit with this new automatic coop door design.
 When we first got our chickens, each night I’d walk up to the coop & close them in. That worked great until the night I’d fall asleep putting our 3 kids to bed, or start watching a late-night movie, & suddenly OOOOHH SHIT, THE CHICKENS!!! …followed by a guilty run to the coop, wondering if I was about to find sleepy hens or a poultry massacre.
Chickens are a tasty snack for lots of predators. It’s a tough spot in the food chain. Locally we have raccoons, possums, weasels, foxes, coyotes, neighborhood dogs, hawks, eagles, owls… my friend Chris who loves fried chicken a little too much… Raccoons at night were my main concern.
A few months of this started to feel like Russian roulette. Like so many other pet chicken owners, I decided to try building an automatic chicken coop door.
On Youtube there are plenty of automatic chicken coop doors that use string to raise/lower a guillotine-style door, sliding vertically in a track. It’s a safe design — it won’t kill chickens if one gets in the way while closing — but I was worried the door would get jammed from ice & snow.
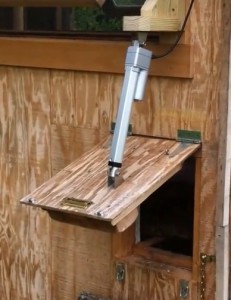
I wanted something with a direct drive to use with a door that swung up on hinges to open. Here’s what I ended up using:
- 12V linear actuator, 8″ extension, IP65 rated w/ built-in limit switches & mounting brackets: ~$55
- (2) 12V programmable digital timers: $5 each
12V DPDT relay w/ base: $3**SEE UPDATED RELAY METHOD HERE- Wiring, inline fuse holder/fuse, terminals: $6
A/C dedicated power option:
- 12V 6-amp power adapter: $7
A/C with power outage protection:
D/C solar power option:
Total cost: $81 dedicated A/C, $111 A/C battery backup, or $123 solar D/C ($138 w/ charge controller)
Linear actuators use a small motor to move an extendable/retractable arm. The arm moves very slowly with 50 to 200 pounds of force. Get one with built-in limit switches & an IP65 rating so dust/water/ice/snow is no problem — pretty great for chicken coops. There are various lengths for the arm travel distance. I got the 8″ model & it takes about 20 seconds to extend/retract the arm … plenty of time for chickens to move out of the way. Small 12V actuators like these usually have a rating of around ~5 amps, so make sure to use a relay, fuse & wiring that’s appropriate. Also make sure the actuator comes with mounting brackets, or you’ll need to come up with something.
Typically, actuators with higher force ratings mean slower movement. Same goes for the arm extension length — longer extension means your door closes more slowly — more time for chickens to get out of the way.
Next, how to power it. If your coop is near A/C power, you could use a 12V power supply instead of the battery/solar panel. Just make sure the power supply is rated for enough amps to reliably drive the linear actuator motor. Better yet, use a 12V battery permanently hooked up to a battery maintainer & you won’t ever have to worry about power outages.
Our coop is on wheels & we move it around our field far away from A/C power, so I needed it to be self-powered. Linear actuators only draw a few amps so a small 12V battery will do the trick — I had an old one lying around that wouldn’t start the lawn mower anymore, but worked great for the coop door.
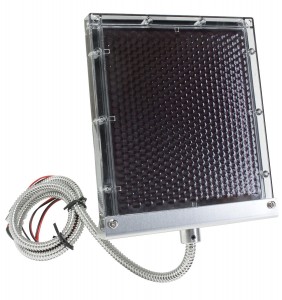 To recharge the battery, I used a small 1.25-watt 12V solar panel. Since the panel’s power output is so low, it acts as a trickle charger, & that way you may not need a solar charge controller as long as the panel is in direct sunlight for most of the day. I’d still recommend a charge controller to make sure the panel doesn’t have a net drain effect on the battery in winter or other low-light conditions.
Last challenge was for the door to open in the morning & close in the evening. I went with a simple setup with very low power draw: two programmable 12V timers.
THE TIMER SETUP BELOW IS OUTDATED. PLEASE SEE THE UPDATED METHOD HERE.
The first timer (the “power timer”) switches on twice a day for 1 minute each to provide power to the actuator. The second timer (the “reversing timer”) energizes a DPDT relay concurrently during one of the power timer events to reverse polarity to the actuator. That opens & closes the coop door.
The last piece is a 12V DPDT relay wired as an H-bridge. This relay has 4 sets of +/- pins: normally closed (NC), normally open (NO), common, & coil. The coil switches the common between the NC pins to the NO pins. For the H-bridge setup:
- connect your power source (+/-) to the timers’ power inputs. Fuse on the (+) wire.
- both timers: jump power (+) over to the 1st switch pin.
- power timer: connect 2nd switch pin (+) to a NC pin on the relay.
- jump that same NC pin (+) to a NO pin, but with opposite polarity.
- reversing timer: connect 2nd switch pin (+) to a coil pin (doesn’t matter which one).
- connect the linear actuator (+/-) to the common pins.
- connect ground (-) to the remaining open pins on NC, NO, & coil.
If when you’re all done the actuator operates the opposite from what you want, just flip the actuator’s connections to the relay’s common pins.
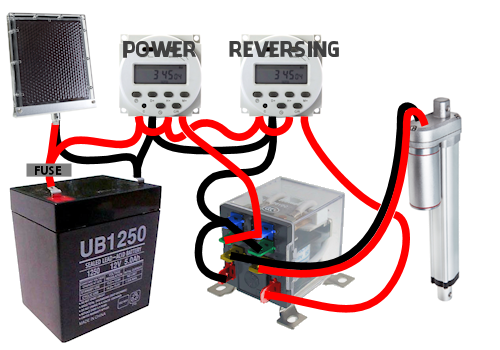
THIS WIRING DIAGRAM IS OUTDATED. PLEASE SEE THE UPDATED METHOD HERE.
Next, program the timers so their clocks are set identically. Let them sit for a few days & figure out which timer is faster than the other. Use the faster timer for the reversing timer.
Power timer: set for two daily events (morning & night) of 1 minute each. For example, 6:30AM- 6:31AM and 9:00PM – 9:01PM.
Reversing timer: set to run concurrently with the morning power timer event, so it comes on sooner & stays on longer than the power timer. For example, 6:30AM – 6:35AM. I prefer the morning run so if anything goes wrong it only means the door won’t open (no big deal).
Whenever you change the time, make sure the reversing timer is always just a bit ahead. This way you can have the morning event start at the same time on both timers.
THE TIMER SETUP IS OUTDATED. PLEASE SEE THE UPDATED METHOD HERE.
Check the timers after a month. I was surprised to find my timers get about 20 seconds off from each other. To compensate, I set my reversing timer event to stay on for 5 minutes — energizing the relay coil is a very minor drain on the battery. That way my system can run for over a year before I’d have to resync the timer clocks. I change the timer settings 3-4 times a year anyway, to adjust for daylight.
Here’s the whole system in action:
UPDATE: In the video I mention mypushcart.com as a good source for the actuator, but they don’t include mounting brackets. Lately you can find IP65-rated actuators on eBay with mounting brackets included for the same $60 price, with free shipping.