
Okay so not quite 20,000 volts, but it’s a nice zap that makes raccoons want to get away, very fast.
One night last spring, a pack of raccoons broke into our basement & ate our baby chickens. I discovered the grisly murders at 1AM. Chicken leg stumps in pools of blood. Dripping red arcs spattered across our chest freezer. Feathers & raccoon paw tracks everywhere. A scene straight out of CSI: Hobby Farm. I spent the next 4 hours cleaning like Winston Wolf in Pulp Fiction.
Since then I’ve been on a personal vendetta to remove food sources, as the best way to discourage the cute little killers from living anywhere close by. I double-walled our compost bin with hardware cloth & ultra-secured the trash can. It wasn’t enough. They started eating the sunflower seeds from our bird feeders. Well played, raccoons.
For awhile I took the bird feeders in at night, but then the early morning birds miss out, all because of the evil raccoons. Can’t have that.
Enter the small-animal-safe electrified bird feeder.
For an electrified bird feeder to work, there needs to be a “live” part that’s energized by the fence charger, & another part that’s the “ground”. The live section needs to be electrically insulated from the ground, so the electricity goes nowhere while there are no raccoons around. When the animal touches the live & ground at the same time, they complete the circuit & feel shocked.
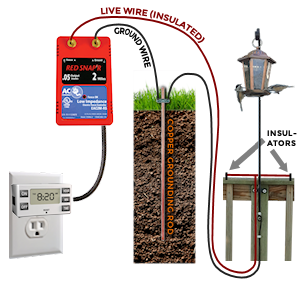
OPTION #1: A length of exposed live wire runs along the railing, & the hanger is grounded.
My bird feeder hanger is mounted with screws into our railing post.
There are two ways to make this work:
- Ground the feeder hanger, & run an exposed live wire along the deck railing.
- Ground the deck railing, & make the whole feeder hanger “live”.
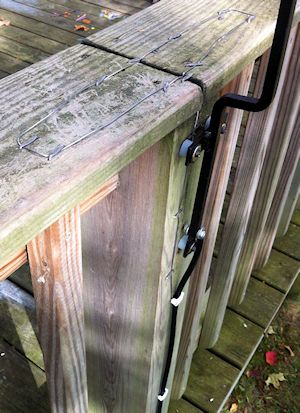 I went with method #2 because the deck railing wires go flat on the railing & I liked how subtle that looked. The hard part is then the feeder hanger needs to be insulated from the deck & can’t touch the screws. I widened the mounting holes to fit short pieces of rubber (beer) tubing inside, & put the screws back through the tubing. I used a rubber spacer & flat washer on the screw head end, & a plastic spacer of 1/2″ PEX water line (which fit nicely over the beer tubing) to hold the feeder hanger away from the deck.
 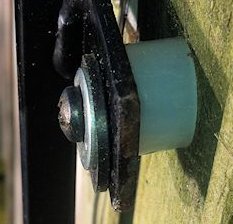 Then I drilled another hole in the hanger & used a small bolt to attach the live wire. I ran a loop of ground wire on top of the railing with fence staples.
In hindsight, method #1 is MUCH easier. The feeder hanger doesn’t have to be changed around since it’s part of the ground — attach the ground wire behind one of the existing mounting screws. Run a short length of exposed “live” wire along the deck railing with a few insulators to keep it from touching. Pretty simple & a lot less work.
Few things to keep in mind: the fence charger isn’t waterproof so either stick it indoors or build a small box outside. The grounding rod should be within 20′ of the charger. I set up my charger just inside the cellar bulkhead & then ran the wires outside. Don’t hit anything when you set the grounding rod: sewer pipes, water lines, power conduit, large rocks…
Here’s the equipment list:
- Patriot PE2 Electric Fence Charger ($32) – THIS IS A LOW-POWER PULSED OUTPUT CHARGER, SAFE FOR SMALL ANIMALS!
- 50′ of 12-gauge insulated fence wire ($24)
- 200′ of 14-gauge steel fence wire ($27)
- GE 15154 digital timer ($12)
- Plastic insulators ($15 for 25)
- 4′ grounding rod & clamp ($25)
- Romex wire staples, 50-pack ($3)

DO NOT use a charger with continuous output (not pulsed).
DO NOT use a charger with output over 0.7 joules (for livestock).
Those can kill small animals.
I used a low-power pulsed fence charger that’s specifically rated for small animals — squirrels, rabbits, raccoons, cats etc. It puts out 0.5 joules at a 1-second interval, with a 2-mile range.
Continuous-output chargers, even with low power output, are dangerous. They shock constantly, so sometimes animals can’t escape. It’s a never-ending taser — the continuous charge overpowers the animal’s muscles & eventually stops their breathing & heart. Pulsed-output chargers shock very briefly & animals have time to escape between pulses.
Some inexpensive continuous-output fence charger models to stay away from: SS-525CS, SS-725CS or EAC10A, which are branded Havaheart, FI-Shock, or Zareba. Amazon has reviews for those like “Good job keeping dogs in, KILLS kittens though” … or another one, “Kills small animals”.
Get a pulsed low-output (under 1 joule) fence charger like the Patriot model listed above. Other fence chargers will work if they have pulsed output, AND less than 1 joule. Here are some other models to consider: EA2M, EA5M, EAC5M. You’ll find these with -RS, -FS, -Z, -BL suffixes which are just the branding … Red Snap’r, Fi-Shock, Zariba, Blitzer.
The total cost is about $140.
 Last year we bought a shiny new Whirlpool fridge, french-door style with the bottom freezer. Eight short months later, water started leaking out the bottom of the freezer & pooling onto the floor. Apparently it had been leaking for awhile because when I pulled the fridge out, I found the water had been draining toward the back wall, quietly warping our hardwood floor. We don’t have the icemaker hooked up so it was definitely a defrost problem, caused by a little drain grommet. Thanks for nothing, Whirlpool.
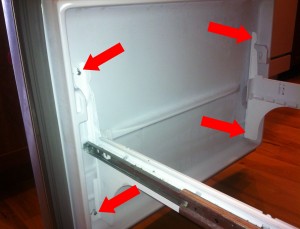 Step 2: Freezer door. It’s 4 screws, one in each corner. Just loosen them a few turns — don’t take the screws out entirely — it’s much easier putting the door back on when the screws are already in place. The door slides up & off.
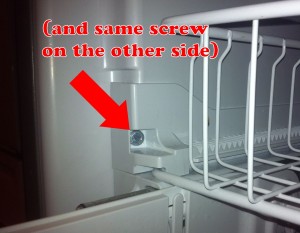 Step 4: Upper basket. Remove the 2 screws at the front of the rails, then lift up the rails slightly on each side, to slide the basket forward.
 On the plastic pieces at the back sides of the upper basket, push in two tabs with your screwdriver on each piece & pop them up. This will let the upper basket slide out off the rails.
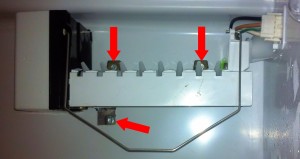 Step 5: Icemaker. Remove the lower screw, then loosen or remove the two screws above the icemaker. Unplug the wire harness where it passes through the rear panel — squeeze the sides of the plug & pull. Lift the icemaker up & out. The water tube will slide out of the guide.
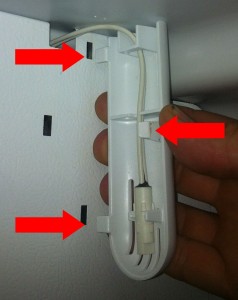 Step 6: Plastic guards. The thermostat guard is the skinny piece to the upper right. Push in (to the right) the tab on the left side in the middle. The guard opens like a door pivoting on the right edge, & pulls out.
 Step 7: Freezer panel. Remove the 4 screws in each corner. Push the thermostat back through the slot at the top, & also push the icemaker plug back through its slot.
 The drain hole is near the front of the rear tray in the middle. It’s pretty wide (1/2″) & short, only ~2 inches long. It goes straight down into a rubber “duck bill” grommet that’s probably plugged up with gunk, that you access from the back of the fridge…
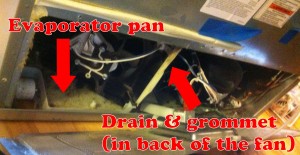
 Step 9: Drain grommet. Pull out the fridge so you can access the back side. Remove the screws (6?) around the lower access panel, pop the power cord up & tilt the panel out of the way. The plastic tray under the fan is the evaporator tray — that’s where the water SHOULD normally be dripping into & evaporating from.