
PLEASE NOTE: Although I initially wrote this post about the Drobo 5N, several commenters have pointed out that the Drobo 5N & 5D use the same chassis & so this is equally helpful for fixing noisy Drobo 5D fans too.
 Drobo makes a nice backup system, but the cooling fans are crap. The fan in my Drobo 5N was no exception & failed after 3 years, most of which it spent on standby with the drives spun down. As far as I know, the Drobo cooling fan runs constantly even when the drives are spun down.
For the cost of a $15 fan & maybe an hour of your time, you can replace the fan in your $500 Drobo5N backup system.
You’ll need a replacement 120x25mm 12VDC 1.9W 2-wire fan, soldering iron & solder (or very small wire nuts), phillips screwdriver, 1/16″ shrink tubing (and lighter) or electrical tape, & a paperclip.
Also see the very helpful comments on these steps from Tad Harrison — the 3rd comment at the end of this post.
- Shut down & unplug the Drobo. Remove the hard drives & remember the drive order in the bays. It might not matter, but why tempt fate?
- Remove the magnetic faceplace & pull out the rubber gasket from the groove behind the faceplate.
- Unscrew the 4 rubber feet on the bottom of the unit. Also remove the small hatch on the bottom that covers the mSATA bay.
- Slide the metal case off the chassis. I don’t think it matters which end you slide it off. The case is split in half on the bottom. You’ll need to lift up one side just a bit to get the case to slide past a few items in the mSATA bay.
- Push in the plastic tabs to remove the fan backplate on one end & the drive bays on the other end. I think there’s 5 tabs for each. This part was easy.
 Unscrew 4 screws total, on the sides at the fan end: 1 upper & 1 lower screw. Leave all the other screws in place. Trust me on this.
- Slide the top of the chassis back & up to separate it from the bottom/sides. This can be tricky – use a flat screwdriver to pry the lower slot closest to the back (see photo) if it’s stuck. Unplug the white plastic fan & power switch connectors when you can get to them – they just pull, no clips.
-
Don’t pry off from the head end!
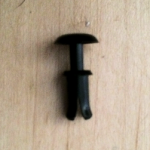
Finally, easy access to the fan! Not so fast, Batman. The fan is held in place by 4 plastic anchors that work like drywall anchors – there’s a center pin which spreads out the tip of the anchor when it’s pushed in all the way. Best method for removal is push the center pin from the fan side with a paperclip or small nail until the anchor pops out. Don’t try prying the anchors from the cap end or you’ll likely end up breaking them off.
- Cut the fan wire close to the old fan so you have decently long leads on the connector plug end.
- Solder (or use wire nuts, or butt splice connectors) the plug onto the new fan wires. If you solder, use shrink tubing! It’s awesome. Remember to slide the tubing on, before you solder.
Now you’re ready to put everything back together. Really this is just an excuse to start the instruction numbering over at #1. Also now that you’re in this deep, let’s make putting your Drobo back together look like 4 steps:
- Reattach the fan to the chassis with the plastic anchors you didn’t break. Make sure the the fan is oriented correctly so it blows air out the rear vent. The side with the hub struts is the “exhaust” side, so you would want that facing the rear. Stare at the fan blade shape for a bit & you’ll figure it out. Some fans have arrows on the cowling that indicate airflow direction.
- Slide the chassis back together, reconnect the fan & power switch connectors, & screw the 4 screws back in. PRO TIP: make sure the fan wires aren’t in the way of the fan blades.
- Snap the fan backplate & the drive bays back in. It can be a little tricky to get the drive bays seated all the way. Make sure you line up the many clear plastic nubs along the bottom edge with the all holes (these are the blue lights that indicate capacity).
- Slide the chassis back into the case. Reinstall the mSATA hatch cover, rubber feet, rubber gasket, drives, & magnetic faceplate. Plug in & turn on.
Nice work. You saved $500 on a new Drobo.
Hope the new fan lasts longer than the old one.
Patrick
Awesome walkthrough. I was able to repair my Drobo 5D using the same instructions since they use the same chassis. Took about 45 minutes and I’m super happy to be back up and running for $20. Thanks for taking the time to make this!
Jeff Bethers
Thank you so much! My Drobo was making some very loud noises! And now after taking some time to find this article I was able to get it running like new in only a few days of waiting for the correct fan to arrive. Very Easy if you just take your time and do the steps in order. Thanks Again!
Tad Harrison
Absolutely marvelous!
I followed the instructions perfectly and now my Drobo is silent.
A few points on the steps:
Step 2: The gasket can stay–take it off after pulling out the drive. That way you don’t need to nick it while trying to get at it with a screwdriver.
Step 4: Slide the Drobo out at the fan end. There is a little flat circular spring for the mSATA bay latch that will catch on stuff if you try to pull the Drobo out the other end. Also, when replacing the Drobo, push it in fan-end first.
Step 7: The prying bit sounded more harsh that it really was. No bending of metal happens–a flat blade screwdriver in those slots indicated by the arrow will gently persuade the fan and top section to slide out back.
Step 10: Telephone Splice Connectors from Home Depot do the job nicely. Put two wires in them and squeeze shut with pliers.
Also, I realized I was in a bit of doubt as to which way was up with the fan. I forgot how the old one was installed. I ended up installing it so the manufacturer’s label is inside the Drobo. Hope that’s correct.
It appears that something happened while I slid the drives in and it doesn’t see one of them. Oh well. It’s now rebuilding 3 drives, so I’ll have to wait a few days for that to finish and try reseating the fourth drive.
Wick
Hi Tad, thanks for the comments, definitely good to have a second perspective & the suggestions. Hope your drive array is done rebuilding! Have a good one.
Tad Harrison
It’s all good now–I saw that one of the wire splices had gotten in the top drive bay. A popsicle stick persuaded it out of the way and the first drive seated properly. That still left me with an overnight rebuild, but like magic the Drobo restored itself.
And it’s silent!
Side note: I realized my Step 4 comment sounded off–slide the unit out by the fan end, and slide it back in the same way it came out. It’s all about not letting the mSATA latch spring drag over the mSATA bay.
Doug
Thanks for this tutorial! I have two Drobo 5D’s and figured I would just replace both fans if I was going to be replacing one anyway. Took me a little while to get the first one done, but once I did the second Drobo was a breeze. The telephone splice connectors worked like a charm for this.
Saved me a bunch of money by replacing those fans myself. Thanks a bunch!
Cheryl Pelavin
Thank you for this! My friend, who is free of mechanical fears, did it perfectly while I cheered on from the side lines. The Drobo is quieter than it’s ever been. Thank you again.
Gehan Gonsalkorale
Great guide! Thought I’d let you know that it’d possible to use a different and silent fan by Noctua.
Their normal fans don’t work as the start voltage must be too high. I tried a case fan and it didn’t start. However their Industrial range has a start voltage of 5.5-6v so I used their NF-F12 industrialPPC-2000 fan successfully. It’s basically silent now – I can only hear the HDs spin.
http://noctua.at/en/products/product-line-industrial/nf-f12-industrialppc-2000
Dave Carlson
The Drobo 5N has a red an white leads coming from the fan and the Noctua has black/yellow/green/blue. Which wires did you splice?
Many Thanks,
Dave Carlson
Wick
Hi Dave, the specs on the model that Gehan linked to indicate it should be a 3-pin fan (ground/positive/tach). If the 3-pin wire colors are black/red/yellow, yellow is tach. If the wire colors are black/yellow/green, green is tach. With 3-pin you just don’t connect the tach wire, which is output from the fan back to the motherboard — not necessary for the fan to operate.
However your fan sounds an awful lot like a 4-pin fan, in which case the wires are:
In terms of simply hooking up 12V power (2- or 3-pin, there’s no difference) to a 4-pin fan … I found the internet was divided on that subject & it probably depends on the fan manufacturer. People reported the fan either ran at full speed, or didn’t turn, or fried the fan. At least one FAQ said it was fine to do.
It’s probably best to buy a 2- or 3-pin fan. 4-pin fans are really meant to have PWM input. But maybe Gehan can help more. Good luck! If you think of it, post back on here how it goes.
David Carlson
Hey, I finally got around to cutting and soldering the 4 Pin Noctua fan and putting my Drobo back together. It’s working like a charm! Thank you everyone for all of your posts! You all rock!
Andrew Simone
Worth noting some of the newer Drobo 5N models appear to have a 2 pin fan with a Brown and Black wire. The Brown wire is positive in those situations and in my case match with the red wire in a 3 pin with black/red/yellow
So:
Brown to Red
Black to Black
Yellow is not needed on the three pin.
Wick
Hi Andrew, good info, thanks for pointing that out.
Gehan Gonsalkorale
Sounds like you have the 4-pin PWM version. I don’t know if that works.
The exact fan I linked to is the 3-pin version and that works for sure.
Jeff balfus
I’m stuck! Got the cover off OK, But I can’t see how to move the piece with the fan. Can you show a wider angle shot. Tried the flat screw driver as mention – nada!
Any suggestions would be appriciated.
Wick
Hey Jeff, sorry, didn’t see your comment until now. Hopefully you got it to slide apart in the months since.
If not, maybe try again & really crank on it with the pry-through-the-slot trick. Look in the slot & make sure you’re prying the right section of the chassis, & alternate both sides. I remember mine was really stuck & I had to work at it for awhile. I think you can watch things flex as you pry to figure out where it’s stuck & then concentrate on that side.
And pointing out the obvious here — make sure you removed the 4 screws I promised were the only ones necessary in step #6. And maybe remove a few more, just in case… Good luck.
George
Honestly dude I love you. Thank you so much for this tutorial. Tad’s comments above were also complimentary to a few steps i wasn’t sure of.
I ordered the exact parts you mentioned and everything worked absolutely flawlessly.
I can gladly say my Drobo 5n has a silent fan and I can move on with my life.
ps. The amount of dust these things collect are insane!
Thanks again. I truly appreciate the instructions above. Even if the fan lasts 3 years I know that I can always go back to this post and do it again 😉
Richard Gunther
Thank you, thank you, thank you. I’ve been so frustrated by the noise my 5N has been making lately. This was a quick (well…2 hours maybe after finding tools, cleaning up, etc.) fix to that, and everything’s back good as new now. Thanks also to Tad’s follow-up comments. I’ll be sure to mention this on social channels and also on the next episode of my home entertainment podcast, Entertainment 2.0.
Wick
Hi Richard, glad to hear it was helpful. Thanks for helping get the word out. Have a good one!
Richard Gunther
Take 2: I guess the fan I put in either died or I was not actually feeling air when I set it back up last night. Either way, I confirmed that the fan I installed was not working, happened to have another replacement fan in the basement, verified that IT worked before putting everything back together, then installed it. And yes, I meant pulling air through and out the back. So far so good. It’s working again!
Richard Gunther
Maybe I spoke too soon! I tried the drive last night, and everything looked fine. Today I found the drive with all yellow lights slowly blinking (several seconds) on and off. As best I can tell, the fan I used may have failed. I could have sworn I felt it pulling air last night. I plan to let it cool down this morning and research what’s going on. Hopefully it shut itself down before anything got cooked!
Wick
Hi Richard, that’s no good. I noticed you wrote “pulling air”. Just to clarify, the normal behavior is for the fan to push air out the rear vent. If it’s pulling air in from the rear vent, the fan is installed backwards & you just need to flip it so the opposite side of the fan is facing the vent. Good luck!
Richard Gunther
I don’t know what I did, but somehow I managed to screw things up. I’ve installed several (3) different fans now. The most recent was the specific fan you link to—the exact replacement for what came with the Drobo. When I first turn it back on after each replacement, the fan starts, and everything works properly. But after just a few minutes, the fan stops and things start overheating. If I shut it down and remote the power, it cools down; when I reapply power, the fan starts, but shuts off as soon as I power up the device! So strange. I’ve replaced the fan on a few 1st gen devices without any problems (or instructions so helpful as Wick’s!).
Has anyone else experienced or heard of similar issues? I’ve searched for information, but I haven’t found anything. Short of buying a new Drobo (or bailing altogether for a Synology or something), I have one last trick up my sleeve. I purchased a 120v external-powered fan that I’m going to try to install. I will have to mod the case to get the cord out, and I’ll just power the fan separately. I’m years past warranty, so drilling an unsanctioned hole or two doesn’t stress me out too much at this point.
Wick
Hi Richard, to me that sounds like a temp sensor or perhaps a fan power supply issue with the Drobo. I don’t know enough about the Drobo to troubleshoot that. The 120VAC fan sounds like a good option, or you might consider running external power via a 12V power adapter to the existing fan — just make sure the adapter’s power output rating is a good match for the fan. You can get a nice DC motor speed controller for ~$9 on Amazon which would allow you to set fan speed if you went with keeping the 12V fan.
Mark Siple
Richard,
How did you come out with this?
My 5N must’ve been blinking for a full day before I noticed it. I’m worried it’s cooked!
Thanx. Mark.
Ben
Oh, I realised I have the same issue as you – did you end up with the external fan option or were you able to fix this at the end…?
Victor Denisov
Thank you very much for this write-up! Replaced the failing fan in my Drobo 5N without any problems.
Robin Jackson
A TIP a question and a plea!
A TIP. If you are using the Industrial fan, remove the rubber corner protectors or you will beak the plastic securing pins when you try and put them back!
A question. I have put all my drives back into the Drobo, booted it but it has not reappeared on my desktop and Drobo dashboard does not see it, is this normal? There appears to be LOTS of disk activity but no sign of my drobo!
A plea, Anyone know wehre I can get one, just one of the plastic securing pins for the fan! Ideally in the UK. 🙁
Fingers crossed my Drobo will finally mount!
Robin Jackson
Rebooted my Drobo and it appeared!!!!!!!!!!!!!
A HUGE thanks to the original poster and everyone else who has contributed tot this thread.
I now have an almost silent Drobo.
Just missing one little plastic locating pin!
Robin
A Hodgson
I’ve ordered a silent replacement fan. I’m in Sydney. But I’ve got no soldiering iron or gear and no experience with this kind of thing… is there anyone in Sydney that could do it for me?
Wick
Hi, the soldering iron isn’t really necessary – you can just twist the wire ends together. Any hardware store should have small wire nuts you can twist on, or butt splice connectors you crimp on with a pair of pliers, or you can just wrap some electrical tape over the wires.
Or if you go the professional route, any computer or electronics repair shop should be able to do this no problem.
Ash
I read your post a few times along with the comments and nervously had a go!
My fan has been making a noise for about 6 months and now its unbearable, even drowning out the tv! I bought all the kit for under a tenner. I followed the instructions and took me about 45mins to an hour, cleaning and taking my time, I plugged it in, the lights lit up again and now its working like a dream!! Thank you
For all you UK’ers I bought this one from Maplin and although its not totally silent, it works. http://www.maplin.co.uk/p/120mm-brushless-12vdc-axial-fan-yz40t
Thanks again
Adam
Damnit! Though these instructions might work for a 2008 4-bay drobo. Wrong size fan. Mine is much smaller (and less efficient I wouldn’t wonder).
Still, it did encourage me to take it apart, and it really needed it. I have so many new fluffy pets now. I am taking a lot more thing apart these days. And the drobo seems to be up and running fine again.
Thanks anyway.
Adam
Dave Zachritz
Thank you very much for this!
I couldn’t get the gasket back on, but who cares? 🙂
THANKS
Thanks for this site. I fixed a broken 5n fan that stopped the other day with a Noctua NF-F12 iPPC-2000 Fan with Focused Flow™ and SSO2 Bearing , bought from newegg for $23 , cut the wire off the old fan and then added it to the NF-F12 , I used the screws that came with the fan to bolt it back together because the push pins did not work anymore. but over all my DROBO5N is back alive hoping 4 to 5 more years out of this fan 🙂
Chandrasekar Rajamani
Thank You!
I was hearing extra noise from my Drobo and suspected that the fan had to be cleaned first. Though I didn’t replace it; cleaning the fan alone has made it quieter!
All the steps were quite clear & easy to follow. Only Step 7 was tricky (as mentioned). A big Thank You to the Author for figuring out and for sharing this
James West
Great instructions. Step 7 was the toughest part. Thanks for putting this together
Dan
So, I did this with my 5d3 and used the Noctua fan. However, I am getting a new sounds out of the fan. Its like a constant hum that sounds like morse code if that makes sense? Has anyone else had this? It boots up, runs fine, but this constant up and down hum sound is driving me crazy. I’m going to open it back up and see if i mount it differently if i still have the sound.
Steve
Thank you for posting such a thorough write-up. I followed your detailed steps and now have a noise-free Drobo 5N. The fan replacement also gave me a chance to clean out the considerable dust that had gathered inside the unit. Your comment in step 7 to “Leave all the other screws in place. Trust me on this.” was very helpful because I was so tempted to remove the other screws when I had a little trouble sliding the top of the chassis off the base. With your guidance, I resisted that temptation and was finally successful in removing the top of the chassis. I particularly like that you gave a link to Digi-Key for the exact fan I found in the Drobo, and for only $10 (plus $10 shipping). So for $20 I feel like I have a new Drobo. Thank you!
Ben
I tried replacing the fan in my 5N, but as soon as I plug in the drobo, still turned off, it starts running and stops immediately when I turn on the drobo. Logically, one would think this is some wiring problem, but there is simply no other variation than using red for the 12V and black for ground. However, after I have tried all combinations, even using the yellow cable, nothing helped. The only thing I can think of is that something must have changed automatically on the firmware level, and I’m now trying to figure out how I could reprogram it… any ideas what this could be or if I could, in any way, change this behaviour by somehow accessing the firmware via the console or something…?
rhy
Thanks for this guide mate worked perfectly. Got the Noctua industrial fan and it’s nearly silent now, much better 🙂
Joe
Any idea where you can get replacement fan anchors. I could not get one out and in the process broke it.
Pierre
Merci, merci beaucoup!
Darrell Spice, Jr.
Thank you for the excellent guide. I replaced the fan in my 5D today, am back up and running without the annoying noise.
I had trouble removing the drive bays, so ended up leaving them in place.
Thanks again!
Jason Hendriks
Replaced the stock fan in my Drobo 5D with a Noctua NF-F12 (120mm, 12v). It runs so quiet that I had to shine a flashlight in there to make sure the thing was spinning. Thank you so much for this post.
Chris B.
Just did this procedure last week after ordering the fan from DigiKey and it worked fine on the first try. Thanks for posting this info as it took the guesswork out of trying to figure out which part would be a match for the original Drobo fan. The unit is now nice and quiet again and has been running with no overheating and 4 of the 5 drive bays filled. I did the solder and shrink wrap tubing bit to make sure this fix would last. I also found an old ice pick in my toolbox was the perfect size to push on the plastic fan mounts from the inside to get them to release. This Drobo is hooked to a Mac mini, which is the media hub for my home theatre setup, so the Drobo noise was really starting to become a problem. Couldn’t tell exactly what was wrong but it sounded like the fan blades were starting to make contact with the fan frame. Maybe if the bearings were going out it was doing something like that.
Tony
I just received a replacement 5D3 for my original that started powering down by itself. Replacement was much louder. Luckily I had a few spare Corsair magnetic bearing fans. I don’t get to use the fancy LEDs, but at least they aren’t sitting in my attic doing nothing.
With new fan, its virtually silent with MUCH greater airflow than before. I feel for an extra $30, Drobo could have put in fans that would make this unit much more attractive to buyers.
Rick
Let me be the latest to thank you. 5+ years later and it is still helpful.
Come to Dallas and I am buying the first few rounds!
Danilo Fascio
Hi Wick! Thank you very much for your tips!
Replaced my very loud fan with a Noctua Redux-700 3-pin and it don’t make a sound now.
I’m getting a strange behavior now (the Drobo 5N reboots after some time and enter a reboot loop). I still don’t know why it’s doing this but I’ll figure it out eventually. But your post was very helpful anyway! You should have a Patreon page so people could send you a appreciation token.
Regards!
Danilo from Brazil.
Robin
To add my recent experience:
1. Replaced the fan with Noctua NF-A12x25 ULN — https://amzn.to/2UhDKbf . The included extension cable came in handy, as I didn’t have to mess with the fan power cable itself, rather, I wired the original (Drobo) fan power coupling to the Noctua extension cable, then simply plugged the fan into the extension. If everything goes to pot, then the fan isn’t dead, just the cable (and the drobo).
2. Had to open the case twice, as I didn’t properly connect the first time.
2a. Tried to simply twist the wires with tape and use the existing power connector — no joy with any spinup.
2b. Ended up soldering simply by twisting a piece of solder in with the black+black wire ends, and then using an open flame to melt the solder in place. Same again with red+red. Shrink tubing and a hair dryer was my friend here.
3. After connecting the fan, I noticed two things:
3a. The wattage was much lower (0.6W vs 1.9W), and the drobo took some time to spin up the fan at the lower current — I presume this is because the fan wasn’t taking the original power, so it downvolted
3b. The CFM was about 40% of the original, so I hope the unit doesn’t overheat at some point down the road. The new fan is massively quieter, however.
4. The data is rebuilding right now, so will keep you posted on whether I get to a successful result.
For reference — my original fan datasheet https://www.mouser.co.uk/ProductDetail/Sunon/MEC0251V3-000U-A99?qs=fnpEE5GccuMchFgwSKfJqw%3D%3D
Jason Law
how is your replacement fan going? did your drobo overheat with the lower air flow rate?.. did you use the ULN cable with the Noctua NF-A12x25 ULN??
todd edge
Went with the above fan, Noctua NF-A12x25 ULN, Ultra Quiet Silent Fan, 3-Pin from the store that starts with A and ends with zon. $30.
Instructions were on-point, removal of fan and repair was very possible thanks to this post. Thank you!
Jason Law
how is your replacement fan going? did your drobo overheat with the lower air flow rate?.. did you use the ULN cable with the Noctua NF-A12x25 ULN??
Dietmar
I just replaced the fan of my 5D and ran into the same problem like Ben: fan is running while the device is turned off, when the device is turned on the fan stops running. Strange. Any helpful suggestions?
Daniel
Glad I found this post. Just ordered a replacement fan.
Daniel Cook
Started the procedure… I am now at step 5 “ Push in the plastic tabs to remove the fan backplate on one end & the drive bays on the other end”
I’m struggling here because both the fan backplate and drive bay tabs are so tight that I’m having problems pulling them down to clear the tab slots.
I don’t want to put excessive force here to break anything.
Do you have a suggestion ?
Daniel
nicoff
Thank you very much for the instructions. The instructions worked perfectly for my Drobo 5N.
Here are some of my notes that I hope can help someone in the future.
1. The original fan is a two-wire fan. It had a black wire (ground) and a red wire (Positive).
2. The fan that I replaced it with is a “bequiet!” brand fan. Link attached: https://www.amazon.com/dp/B00ECWKD6I?ref_=cm_sw_r_cp_ud_dp_B01KERA9VW981RY7YSXM
3. The replacement fan has 3 wires. All wires are black. The number 1 wire is the ground wire. The middle wire is the positive. And the third wire is the Tach.
4. I connected the number 1 wire of the new fan to the black wire of the Drobo and the middle wire from the new fan to the red wire in the Drobo. I did not use the third wire (tach).
5. I used the telephone connectors suggested by Tad Harrison (thank you!!). That saved the trouble of having to use a soldering iron, however… see tips below.
Tips
1. The telephone wire connectors are bulkier than the soldered connection. Therefore, you have to be very careful when routing the wires to avoid interference with the fan.
2. After putting the fan assembly back in the case but PRIOR to putting the screws back in, make sure to blow air into the fan (I used my mouth). If the fan does not rotate, the new wiring is likely touching the blades and hindering the movement (lesson learned!).
3. After installing the plastic housing for the hard drives, look inside the housing to make sure that the new wires are not intruding into the space. Otherwise, the hard drives may not be able to connect properly.
Last but not least, when I took out the hard drives, they felt pretty hot to the touch. I believe that the old fan was not only noisy but it was no longer cooling the unit properly.
I wish that I had found this article sooner!
Thanks again!
mcburn13
I purchased the following Noctua fan:
Noctua NF-S12B redux-700, Ultra Quiet Silent Fan, 3-Pin, 700 RPM (120mm, Grey)
https://www.amazon.com/dp/B00L8IYCJI?psc=1&ref=ppx_yo2ov_dt_b_product_details
And these connectors which I think are great alternative to soldering:
Wire Splice Connector, 2 Way Automotive Wire Connectors
https://www.amazon.com/dp/B072P15279?psc=1&ref=ppx_yo2ov_dt_b_product_details
no stripping; just snap them in on each side. Anyway I had first soldered it and it appeared the fan wasn’t on, and the unit turned off after a while like previous. I thought it may have been the soldering job so I took it apart to replace with the plastic splice connectors. Before I re-cut the wires I tested the fan with it off of the chassis. The fan turned about 1/8th turn then stopped. Any time I re-power the unit that appears to be the case. So, replaced with the plastic connectors, tested and same result. Is this fan compatible? Perhaps the 0.6W isn’t enough? Let me know your findings as some of the fans mentioned aren’t available, also would prefer to use a 3 pin fan and just electrical tape off the tach (yellow) wire. But, great instructions though!